
A drill bits organizer is a great way to arrange and store your drill bits when you aren’t using them. It helps you sort them according to size, so you can easily find the right drill bit without any hassle.
So, in this article, we’ll show you how to make a simple yet sturdy drill bit organizer for your workspace. Let’s dive in!
What will you need?
To construct a drill bit organizer, you will need a few materials. These include;
- A ¼ inch thick sheet of plywood
- Double-sided tape
- An M6 threaded rod
- A drill size template.
- M6 hex nuts and cap nuts
Once you’ve got all these, you can start building the organizer.
Cut Out the Frame for The Drill Bit Organizer


Using a table saw, mark out and cut two blanks measuring 335 x 160 mm from the plywood sheet. This will form the base of the drill bit organizer.
After cutting that, cut three additional blanks measuring 120 x 161 mm from the plywood sheet. These will be the drill bit holders.
Be very careful with the table saw to avoid injuring your fingers.
Print Out the Drill Bit Template

The drill bit template is a label or a guide that shows you where each drill bit will be stored on your organizer.
Once you download it, print the template out on A4 paper. Using a box cutter or scissors, cut out the template.
Glue The Template to The Blanks
Coat the back of each template with glue using a glue stick. Glue each template to the three drill bit holders.
Since there are three drill bit holders and only two labeled templates, you can use the third for anything you want. You can customize its holes to fit any tool you want.
Note: When gluing the templates, make sure their edges line up perfectly with the edges of the drill bit holders.
Assemble The Base of the Drill Bit Organizer

Cut out two strips from the roll of double-sided tape. Place them at the corners of one of the 335 x 160mm base blanks.
Using the tape, join the second base blank to the first one. Make sure their edges line up perfectly.
Glue The Drill Bit Holders to The Base


Take the drill bit holder that has the templates with the largest holes and set it aside. Take the remaining two blanks and attach them to the 335 x 160mm base with double-sided tape.
Make sure the templates on the blanks are facing up. Also, ensure that the corners of the blanks line up with the base’s corners.
Now, take the blank carrying the template with the largest holes and use it to bridge the other two blanks on the base. Make sure the holes at the corners of the blank line up with the holes at the corner of the bottom blanks.
Join them with the double-sided tape.
Drill the Bolt Holes

You’ll need nuts and bolts to help join your drill bit organizer after removing the tape. So, you need to drill the bolt holes.
Using an M6 drill bit, drill the holes at the top corner of each blank. Make sure each hole goes through both the base and the blank.
Drill The Holes in The Bottom Drill Bit Holders

First, remove one of the blanks at the bottom of the base using a box cutter to pry them apart. Next, make sure all the edges of the templates are still lined up with the base’s edge.
Place the organizer on the drill bench. Using the drill bit size specified on each hole in the template, drill each hole in the organizer.
NOTE: Do not drill the holes on the top blank template yet.
Make sure you drill the holes through the blank template and the base.
Drill The Holes in The Top Drill Bit Holder

After drilling the holes on the two templates, remove all the blanks from the base. Next, take the top blank and attach it to the base with double-sided tape.
Make sure the holes at the top corner align well with the holes on the base. Using the drill bit specified on the template, drill the blank all the way through the base.
Clean the shredded paper and wood away from the surface.
Cut Out the Bolts from The Threaded Rod
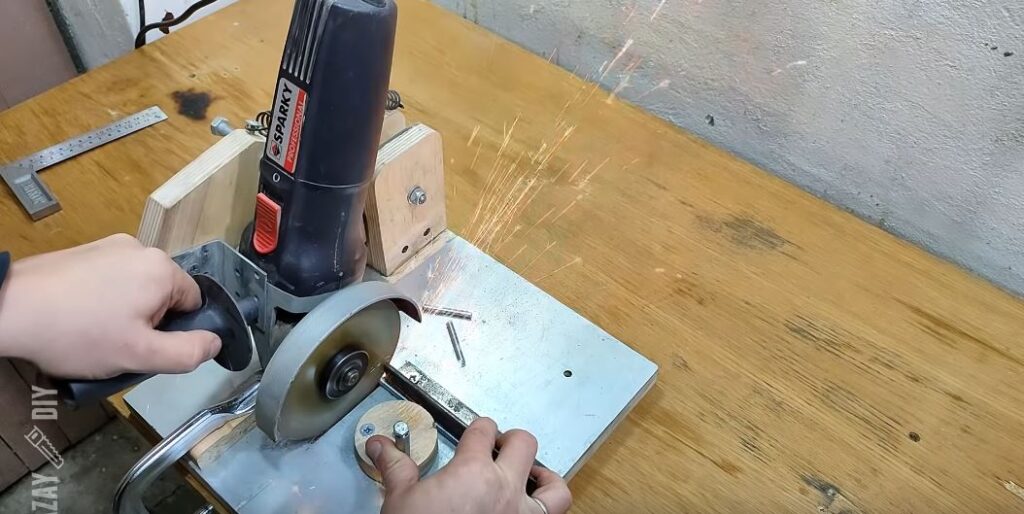
Place the M6 threaded rod on your workbench. Measure and cut four 50mm sections from the rod using an angle grinder.
Measure and cut four more 70mm sections from the angle grinder. Remember to wear face protection to guard your face against sparks.
Shape The Bolts


After cutting the bolts, tidy up their ends with the angle grinder. The ends of the bolts should have a conical shape.
To achieve this, hold the bolts at an angle of about 45 degrees to the angle grinder. Slowly rotate the bolt until you have a conical end.
Assemble The Base


Screw hex nuts onto the bottom of all six M6 bolts. Remember the 335 x 160mm base piece you removed earlier. Insert these bolts into the bolt holes on the blank.
The short 5mm bolts should be in the corners of the blank, while the taller 7mm bolts should be in the holes at the center.
Line up the holes on the second base blank with the holes on the first, and insert the second base on top. Using hex nuts, secure both boards to each other.
Tighten the hex nuts with a spanner.
Add The Drill Bit Holders


Screw a third hex nut on the bolts. Make sure you leave a distance of about 5mm between the second and third hex nuts.
Put the two bottom drill bit holders on their respective bolts. Make sure the holes on the bottom match the hole on the top.
Secure the drill bit holders with a cap nut on the smaller bolts and a hex nut on the taller bolts. Add another hex nut on the four taller rods with 5mm spacing to the ones below them.

Finally, add the drill bit holder for the bigger drill bits on top.
Again, make sure the holes line up correctly before you secure them. Secure the drill bit holder to your bolts with a cap nut.
Final Product


Your drill bit holder is finally complete. All you need to do now is to arrange your drill bits in it and enjoy the superior functionality it provides.
If you’re looking for more cool DIY projects like this, you can check out the Mazay DIY channel on YouTube. You can also download the plans for this project and several others on his website. You can download the drill bit template.


